告诉你如何在 Ubuntu 22.04 上安装 Unbound DNS 解析器
发布时间:2022-07-09 13:24 所属栏目:118 来源:互联网
导读:Unbound 是一个免费的开源递归和验证 DNS 缓存服务器,它使用 DNS-over-TLS 和 DNS-over-HTTPS 来加密连接。Unbound 比 Bind9 快得多,可以帮助减少网页和其他需要 DNS 解析的调用的加载时间。Unbound 还支持 DNSSEC 验证,因此它可以作为您网络上的信任锚。
|
Unbound 是一个免费的开源递归和验证 DNS 缓存服务器,它使用 DNS-over-TLS 和 DNS-over-HTTPS 来加密连接。Unbound 比 Bind9 快得多,可以帮助减少网页和其他需要 DNS 解析的调用的加载时间。Unbound 还支持 DNSSEC 验证,因此它可以作为您网络上的信任锚。 我想向您展示如何在 Ubuntu 22.04 上安装 Unbound。这可以安装在 Ubuntu 服务器或桌面上,您将获得比默认设置显着的 DNS 解析速度。 你需要什么 为此,您唯一需要的是一个正在运行的 Ubuntu 实例——尽管它也可以安装在基于 RHEL 的发行版上——以及一个具有 sudo 权限的用户。就是这样:让我们加快 DNS 解析速度。 如何安装 Unbound 幸运的是,在默认存储库中找到了 Unbound,因此要安装它,请登录到您的 Ubuntu 机器并发出命令: 复制 linuxmi@linuxmi:~/www.linuxmi.com$ sudo apt-get install unbound -y 1. 如果您正在使用基于 RHEL 的发行版,则该安装将是: 复制 linuxmi@linuxmi:~/www.linuxmi.com$ sudo dnf install unbound -y 1. 如何配置 Unbound 安装 Unbound 后,我们需要创建一个新的配置文件。使用以下命令创建该文件: 复制 linuxmi@linuxmi:~/www.linuxmi.com$ sudo nano /etc/unbound/unbound.conf.d/myunbound.conf 1. 在该文件中,粘贴以下内容: 您可以编辑上述配置,但要知道它应该按原样工作。保存并关闭文件。 复制 server: port: 53 verbosity: 0 num-threads: 2 outgoing-range: 512 num-queries-per-thread: 1024 msg-cache-size: 32m interface: 0.0.0.0 rrset-cache-size: 64m cache-max-ttl: 86400 infra-host-ttl: 60 infra-lame-ttl: 120 access-control: 127.0.0.0/8 allow access-control: 0.0.0.0/0 allow username: unbound directory: "/etc/unbound" logfile: "/var/log/unbound.log" use-syslog: no hide-version: yes so-rcvbuf: 4m so-sndbuf: 4m do-ip4: yes do-ip6: no do-udp: yes do-tcp: yes remote-control: control-enable: yes control-port: 953 control-interface: 0.0.0.0 接下来,我们需要使用以下命令为 Unbound 创建一个日志文件: 复制 linuxmi@linuxmi:~/www.linuxmi.com$ sudo touch /var/log/unbound.log 1. 通过以下方式为日志文件提供适当的权限: 复制 linuxmi@linuxmi:~/www.linuxmi.com$ sudo chown unbound:unbound /var/log/unbound.log 1. 最后,使用以下命令启动 Unbound 服务: 复制 linuxmi@linuxmi:~/www.linuxmi.com$ sudo systemctl enable --now unbound 1. 输出如下: 复制 Synchronizing state of unbound.service with SysV service script with /lib/systemd/systemd-sysv-install. Executing: /lib/systemd/systemd-sysv-install enable unbound 1. 2 如何测试 Unbound 启动服务后,立即发出命令: 复制 linuxmi@linuxmi:~/www.linuxmi.com$ dig baidu.com @localhost 1. 您应该会看到与此类似的输出: 复制 ; <<>> DiG 9.18.1-1ubuntu1.1-Ubuntu <<>> baidu.com @localhost ;; global options: +cmd ;; Got answer: ;; ->>HEADER<<- opcode: QUERY, status: NOERROR, id: 12084 ;; flags: qr rd ra; QUERY: 1, ANSWER: 2, AUTHORITY: 0, ADDITIONAL: 1 ;; OPT PSEUDOSECTION: ; EDNS: version: 0, flags:; udp: 1232 ;; QUESTION SECTION: ;baidu.com. IN A ;; ANSWER SECTION: baidu.com. 600 IN A 220.181.38.148 baidu.com. 600 IN A 220.181.38.251 ;; Query time: 630 msec ;; SERVER: 127.0.0.1#53(localhost) (UDP) ;; WHEN: Sun Jun 19 08:57:13 EDT 2022 ;; MSG SIZE rcvd: 70 注意查询时间为 603 毫秒。然后,让我们再次运行该命令: 注意 108 毫秒的查询时间。这相当快。但是,让我们再次运行命令: 复制 linuxmi@linuxmi:~/www.linuxmi.com$ dig baidu.com @localhost 1. 您的查询时间应该要少得多。我在第二次尝试时收到了 0 毫秒的查询时间,在第三次尝试时还是收到了 0。 恭喜,由于开源的 Unbound DNS 解析器,您的 DNS 查询现在更快了。如果您选择,您甚至可以将该服务器用作基于 LAN 的 DNS 服务器。 (编辑:ASP站长网) |
相关内容
 Debian、Ubuntu、Linu
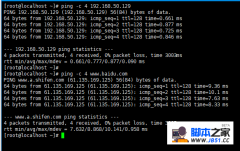 CentOS搭建V~P~N服务
网友评论
推荐文章
热点阅读